Set up 2-step verification (MFA) for Office 365

User Instructions to set up 2-step verification for Office 365

To enhance security we will be adding 2-step verification (also called multi-factor authentication or MFA) to our email system. You will have to set up your account to use it.

By setting up 2-step verification, you add an extra layer of security to your Office 365 account. You sign in with your password (step 1) and a code sent to your phone (step 2).

  1. Sign in to Office 365 with your work or school account with your password like you normally do. After you choose Sign in, you’ll see this page:
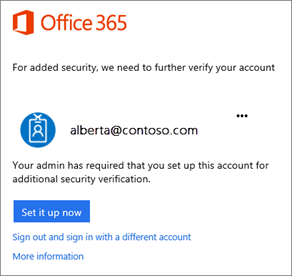
First Sign in screen

  1. Choose Set it up now.
  2. Select your authentication method and then follow the prompts on the page. Or, watch the video to learn more.
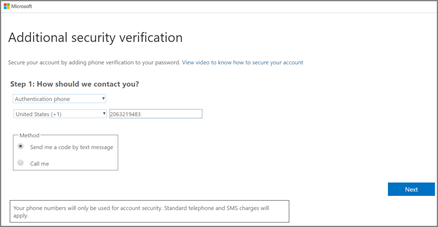
Choose your authentication method and then follow the prompts on the screen.

  1. Once you complete the instructions to specify how you want to receive your verification code (We suggest Authentication phone and Send me a code by text message), the next time you sign in to Office 365, you’ll be prompted to enter the code that is sent to you by text message, phone call, etc. To have a new code sent to you, press F5.
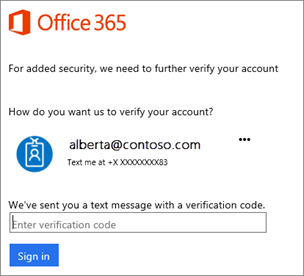
    When you sign in with 2-step verification, you'll be prompted for a code.

  2. You’ll get an app password that you can use with Outlook, Apple Mail, your Android or Iphone, etc. Choose the copy icon to copy the password to your clipboard. You won’t need to memorize this password but be sure to capture it (take a picture or write it down) because you will not have the opportunity to see it again.
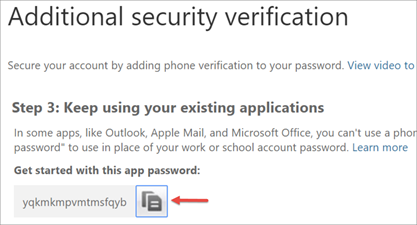
    Image of the copy icon to copy the app password to your clipboard.

Next steps

If you’re using other apps like Outlook on your desktop, you’ll need to to use this app password or you can create a new app password so they can connect to your Office 365 account.

Create an app password for Office 365

An app password is a code that gives an app or device permission to access your Office 365 account.If your admin has turned on set up 2-step verification for your organization, and you’re using apps that connect to your Office 365 account, you’ll need to generate an app password so the app can connect to Office 365. For example, if you’re using Outlook 2016 or earlier with Office 365, you’ll need to create an app password.

  1. Check whether your Office 365 admin has turned on 2-step verification for your account. If they haven’t, when you try to do these steps you won’t see the options in Office 365.
  2. If you haven’t already done so, set up your account to use 2-step verification.
  3. Sign in to Office 365 using your password and verification code.
  4. Choose Settings Office 365 Settings button > Office 365.
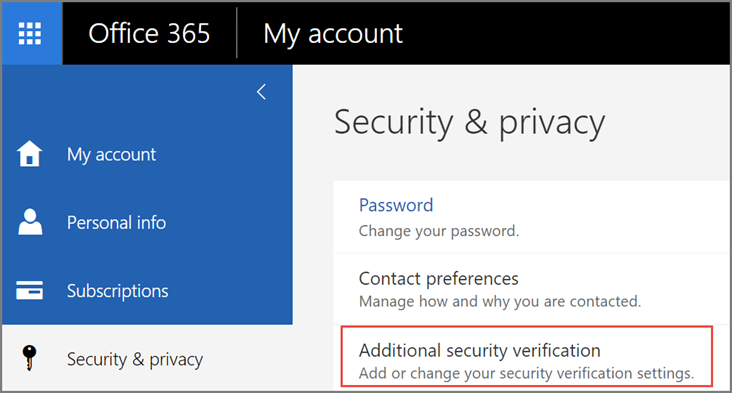
  5. Choose Security & Privacy > Additional security verification.

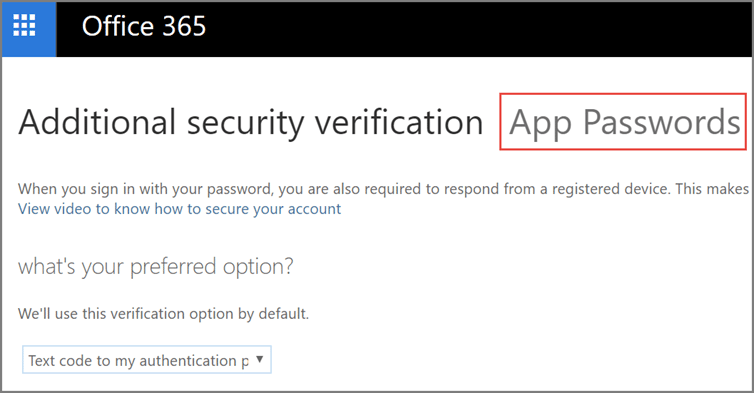
  1. Choose Update my phone numbers used for account security. This will display the following page:
  2. At the top of the page, choose App Passwords.

  1. Choose create to get an app password.
  2. If prompted, type a name for your app password (ex. Outlook), and click Next.

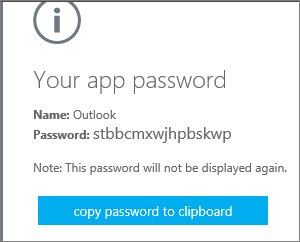
Choose copy to your clipboard.

Choose copy password to clipboard. You won’t need to memorize this password but it will not be able to be viewed again so ensure you capture it before closing.

Tip: If you create another app password, you’ll be prompted to name it. For example, you might name it “Outlook.”

  1. Go to the app that you want to connect to your Office 365 account. When prompted to enter a password, paste the app password in the box.

To use the app password in Outlook

You’ll need to do these steps once.

  1. Open Outlook, such as Outlook 2010, 2013, or 2016.
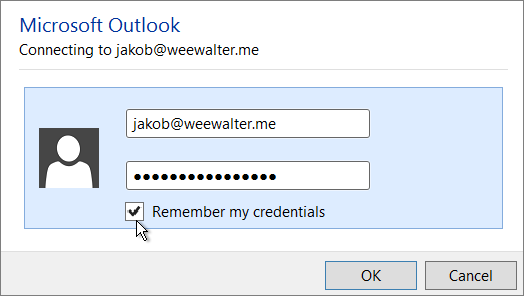
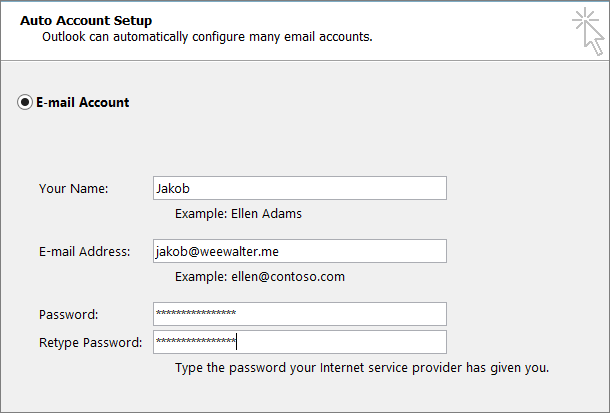
  2. Wherever you’re prompted for your password, paste the app password in the box. For example, if you’ve already added your account to Outlook, when prompted paste the app password here:Paste your app password in the Password box.
  3. Or, if you’re adding your Office 365 account to Outlook, enter your app password here:

Enter your app password in both Password boxes.

  1. Restart Outlook.

Our Take on the New Surface 5… I Mean New Surface Pro

Many people are already asking whats with the new surface pro?  Is it worth an upgrade?  Well after a quick review of what the new surface can do we came up with a short list of items that we thought brought the most value to the New Surface Pro.

Our Top 3 reasons we would consider an upgrade from a Surface Pro 3 or Surface Pro 4

  1. Connectivity – With the arrival of the New Surface Pro Microsoft is finally adding the option for integrated 4G LTE.  This has been long overdue for a business tool such as the surface.  We all want to compute on the go and now we can much more easily.
  2. Battery Life – Microsoft claims that the New Surface Pro will last up to 13.5 hours on a single charge. This compares to nine hours with the Surface Pro 4 which is a significant improvement.  This claim is based on figures that refer to video playback so I’m hopefully optimistic that it translates to similar increases overall.
  3. Size Matters – Surface Pro is both lighter and quieter. There’s no longer a fan inside the m3 and i5 models, thus reducing the weight of the i5 version from 1.73 lbs to 1.7 lbs.  And if you’re upgrading from the Surface Pro 3 you go from 1.76 to 1.7 and get a larger display to boot.

Interesting and notable mentions: Though price is similar to the Surface Pro 4, Microsoft’s actually charging more because the Surface Pen ($99) is no longer included.

Our Opinion: The New Surface Pro is likely a practical and worthwhile update for Surface 3 Owners.  Surface Pro 4 owners are unlikely to be motivated to upgrade unless battery life and 4G connectivity are essential or important deciding factors.

File Folder Creation Takes Several Minutes or Freezes and Crashes

So you’re running Windows 10 and are accessing file and folder shares over your network.  You would think creating a new folder would be a simple task but then you find your computer freezes for several minutes when simply creating a new folder. On all other occasions, the windows explorer locks down, and the cursor is left after the last letter entered in the new folder name. The folder gets a time stamp immediately, but it takes 2-3 minutes before it locks up and you can continue to work.  We have also noted this behavior on local drives (C: and D:).

We found creating a folder using command prompt works immediately.  (md c:\TMD results in a folder named TMD on the c drive with no hesitation)

If you have been frustrated with this issue you’re not alone!  After spending countless hours troubleshooting this issue and doing everything from removing antivirus and malware protection to disabling offline files and search indexing it appears to be a Microsoft bug.  In an update posted 1/26/2017 which we didn’t see it directly reference this issue but after install the delay was gone.  see here

Symptoms:  On the problematic computer, when trying to create a new folder in Windows Explorer on a network file share, there is a long delay anywhere from a 1-3 minutes before the folder is created.  The delay locks the Windows Explorer window completely and occasionally will generate an error.  We have seen this folder creation issue on multiple brand new out of the box machines running Windows 10 build 1607 (Anniversary Edition).

The Fix: You can find the fix on Microsoft’s Update Catalog (KB32116755)

If this was helpful please let us know!

Microsoft Recalls Surface AC Adapters

surfaceMicrosoft has initiated a voluntary recall for AC power cords (the cord that plugs into an electrical outlet) sold with the Microsoft Surface Pro and Microsoft Surface Pro 2, and with any Microsoft Surface Pro 3 purchased prior to March 15, 2015 (“pre-March 15, 2015 Surface Pro 3”). This is being done in cooperation with various government regulatory agencies.

If these AC cords are sharply and repeatedly bent or wrapped tightly over an extended period of time, they may become damaged. Damaged AC power cords can overheat, posing a potential fire or shock hazard.

Action Required:

  • Stop using your AC power cord if you have a Surface Pro or Surface Pro 2, or a pre-March 15, 2015, Surface Pro 3. Replacement AC power cords will be provided at no cost through the program website.
  • Please go to the Microsoft website at www.surface.com/powercord to obtain your free replacement AC power cord. You should dispose or recycle your replaced AC cord in accordance with local requirements.
  • Review the cord care instructions on the Surface support page at Power Cord Care.