Is your Outlook 2010 Starting in Safe Mode?

Microsoft’s Patch Tuesday update KB 3114409, intended to help admins keep Outlook 2010 from starting in safe mode, has in fact done the opposite. Many Outlook 2010 customers report that installing KB 3114409 forces Outlook to start in safe mode.

As of early Wednesday morning, the patch has been pulled, but if you’re experiencing odd problems with Outlook 2010 — it opens in safe mode only (always opens maximized and has no sounds, no reading pane, or other view settings that stick), has broken templates, and much more — you should look at theKB 3114409 article for instructions on how to remove the patch or call TMD Technology Service for assistance.

www.TMDTechnology.com

Outlook 2013 | 2010 – Export Auto Fill / Auto Complete data

This document will assist with the locating and saving a AutoFill / AutoComplete file in Outlook 2013.

Note: This document will help you locate the auto complete Stream_Autocomplete file associate with your Outlook account, for outlook 2010 and Outlook 2013 using Windows 7 and 8/8.1. The path where the file is stored is C:\Users\*username*\AppData\Local\Microsoft\Outlook\RoamCache. Below are directions on how to find this file.

*Show Hidden Files and Folders*

How to locate and save the “Auto Complete file” in Outlook 2010/2013 for Windows 7/8.1.

    1. Open Start Menu.
      • Win 7: Select the Windows Start Button.
      • Win 8/8.1: Press the Start Button on your keyboard to launch the Windows 8 tile menu or hover your cursor toward the lower left corner of your window to make the Start Button appear.
Windows 7 Windows 8/8.1
Windows7Startbutton Windows 8 Start button
    1. Double-click on Computer if using Windows 7, for Windows 8/8.1 users type Computer and select the Computer tile
      • Windows 7

Windows 7 Computer folder

      • Windows 8/8.1

Computertile

    1. Double-click on Local disk C:

Windows 8 Local Disk C

  1. Double-click on Users folder.

Users folder

    1. Double-click on Username of the target user.

Users Profile

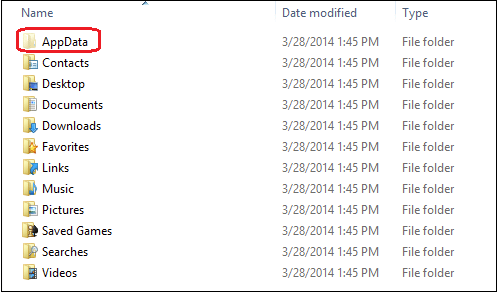
    1. Double-click on the AppData folder.
      • Must have administrative privileges

AppData folder

    1. Double-click on the Local folder.

Local folder

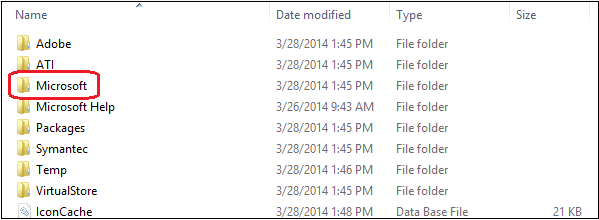
    1. Double-click on Microsoft folder.

Microsoft folder

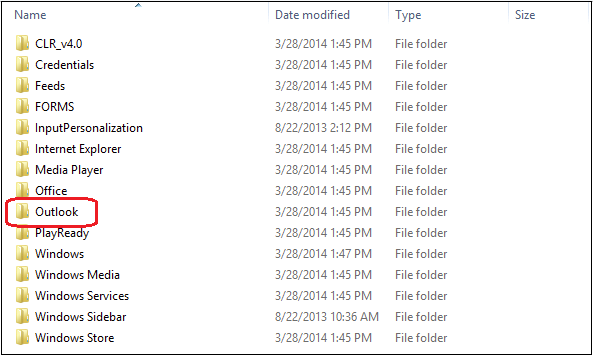
    1. Double-click on Outlook.

Outlook folder

    1. Double-click on RoamCache.

RoamingCache folder

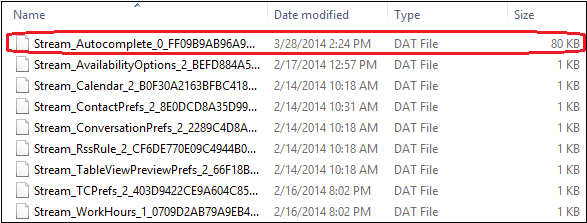
    1. The file that starts with Stream_Autocomplete_**** contains the Autocomplete file used in Office 2013.

Stream_AutoComplete File>

  1. Save this file to a flash drive or other media target and use it to import the Auto Complete names into another Outlook 2013 account.
  2. To import first rename any existing autocomplete file to autocompletexxx.old Then you must rename the newly imported file to match the existing file name in the target location.

How to turn on “Automatic Replies (Out of Office)” or the “Out of Office Assistant”

For Outlook 2013 and Outlook 2010

  1. Click the File tab, and then click the Info tab in the menu.

    Outlook File Menu Snapshot

  2. Click Automatic Replies (Out of Office).

    Outlook 2013 Out Of Office feature Snapshot

    Note If you do not see this option, you are not using an Exchange account. Please go to this section: How to enable Automatic Replies in non-exchange account.

  3. In the Automatic Replies dialog box, select the Send Automatic Replies check box.
  4. If you want to specify a set time and date range, select the Only send during this time range check box. Then set theStart time, and then set the End time.
  5. In the Inside my organization tab, type the message that you want to send within your organization, and in theOutside my organization tab, type the message that you want to send outside your organization.
  6. Click OK.
  7. If you selected the “Only send during this time range” option in step 4, the Automatic Replies (Out of Office) feature will continue to run until the date and time set for the End Time in step 5 is reached.
    Otherwise, the Automatic Replies (Out of Office) will continue to run until you repeat step 1 and select the “Do not send automatic replies” option.

Need assistance with accessing your email remotely?  Call us  TMDTechnology.com