How to remove an Android default app setting

So you’re using your Android phone (Not while driving down the road of course) and you tap on a link in an email or download an attachment and the phone pops up a dialog box asking you which app you’d like to use to complete the action. If you select the wrong app and hit the Always button in that dialog box, you will probably be stuck opening all of your PDFs or word docs in the wrong viewer indefinitely. It’s pretty easy to change the default app for launching different types of URLs and files.

When you first launch a file or link, that’s when you will either be prompted to choose an app or taken directly to the app it’s already associated with. Different types of URLs and file attachments can be assigned to different apps, so tapping on a PDF file can launch the Amazon app instead of Adobe or any other slew of viewers. If you’ve accidentally selected the wrong default app for something, you can remove that setting so Android prompts you to make a choice again the next time you launch that file/link.

How to remove an Android default app setting

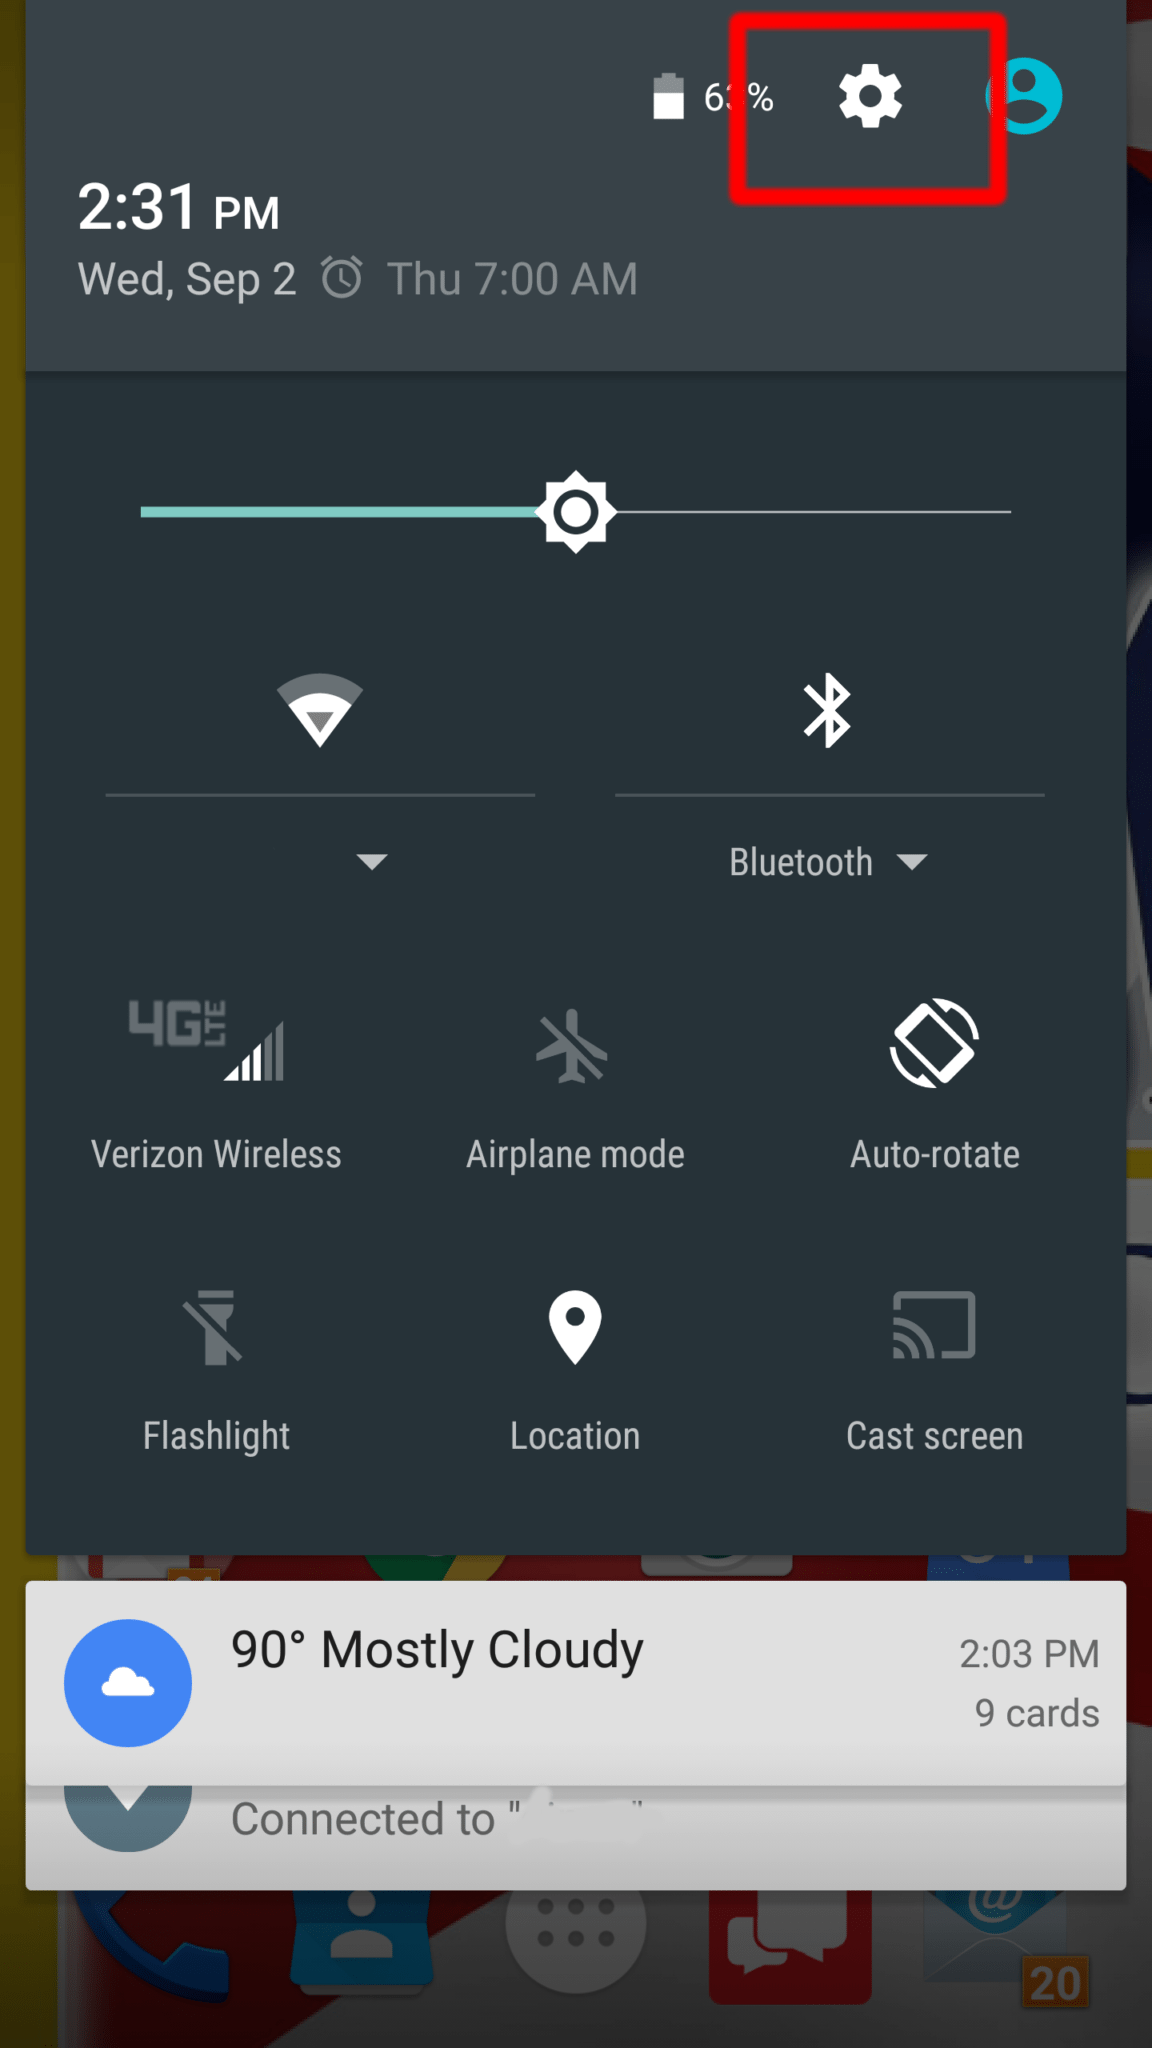
1. Navigate to Settings on your Droid. You can launch Settings by tapping its shortcut in the apps menu or pulling down the notification drawer and tapping on the Settings icon (Usually a gear).

How to change the default app in Android

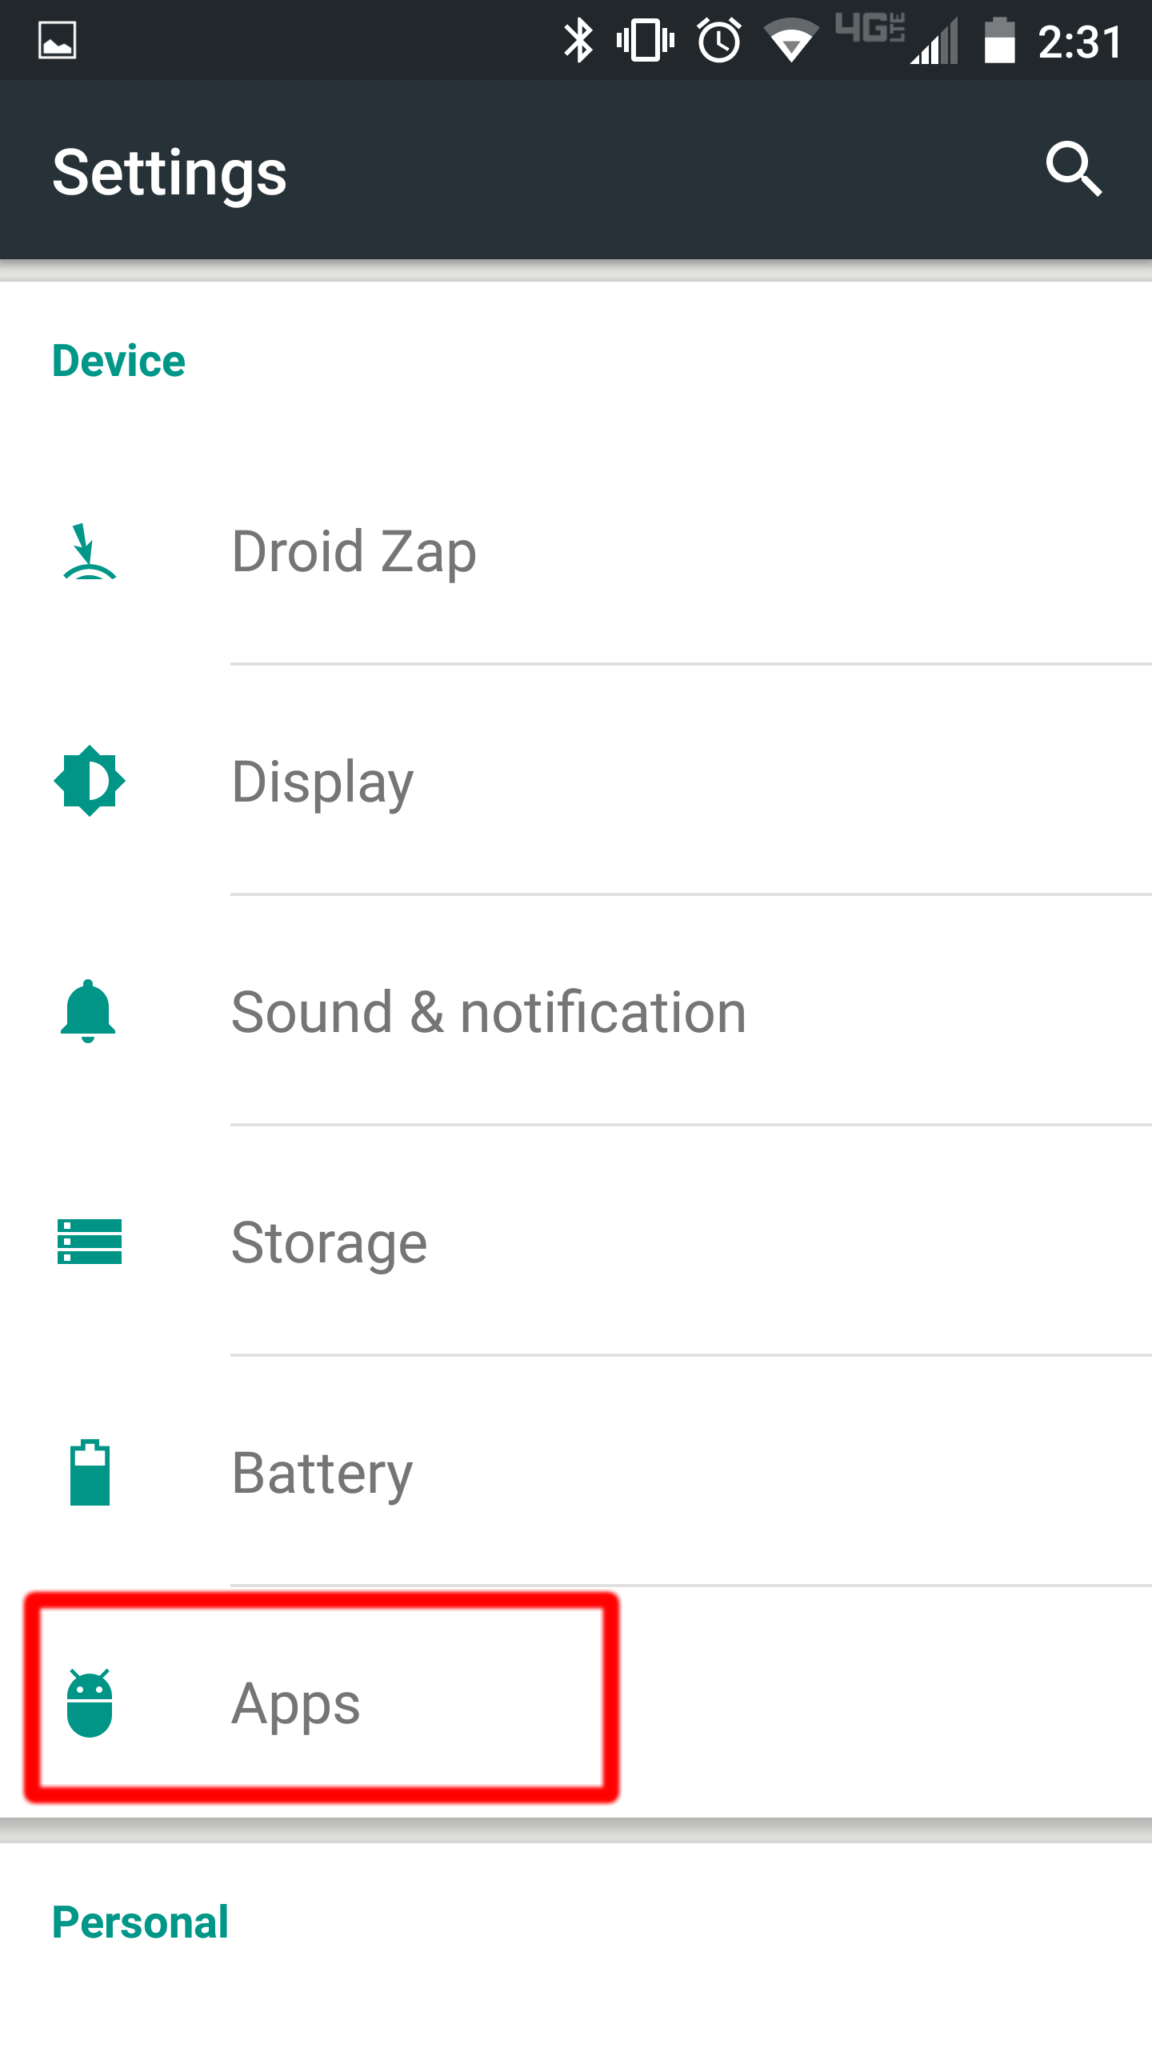
2. Enter the Apps menu. On some phones it will be called Application Manager or something along those lines.
How to change the default app in Android
3. Select the App you want to work with (You may need to swipe over to the All apps list).
How to change the default app in Android
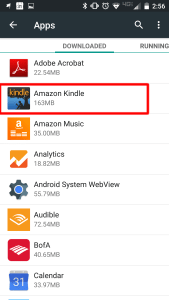
4. Select the app you want to remove as default. In this scenario we don’t want Amazon opening our PDf files
How to change the default app in Android
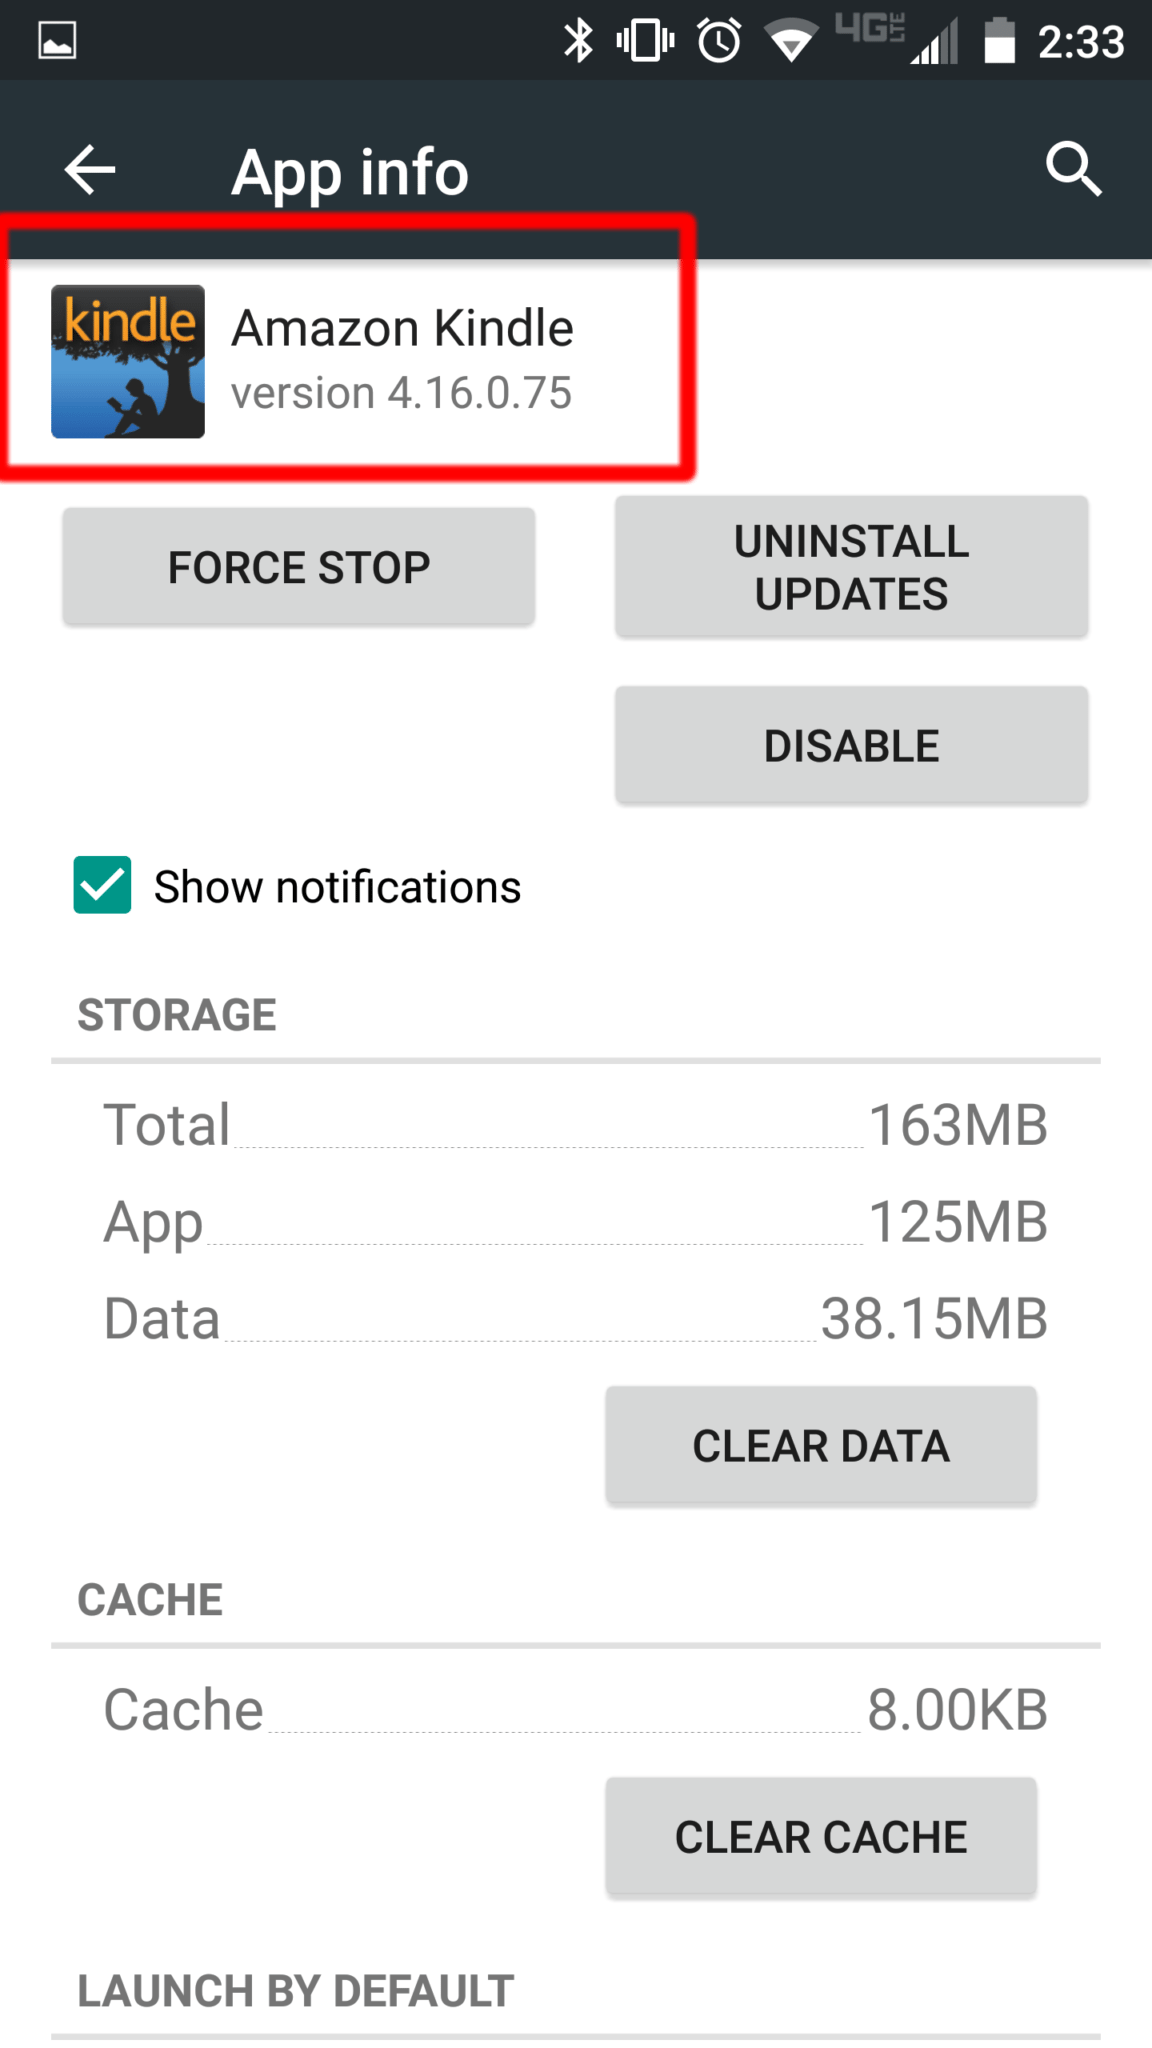
5. Tap Clear Defaults. (Note if it’s grey then it is not set as a default app)
How to change the default app in Android
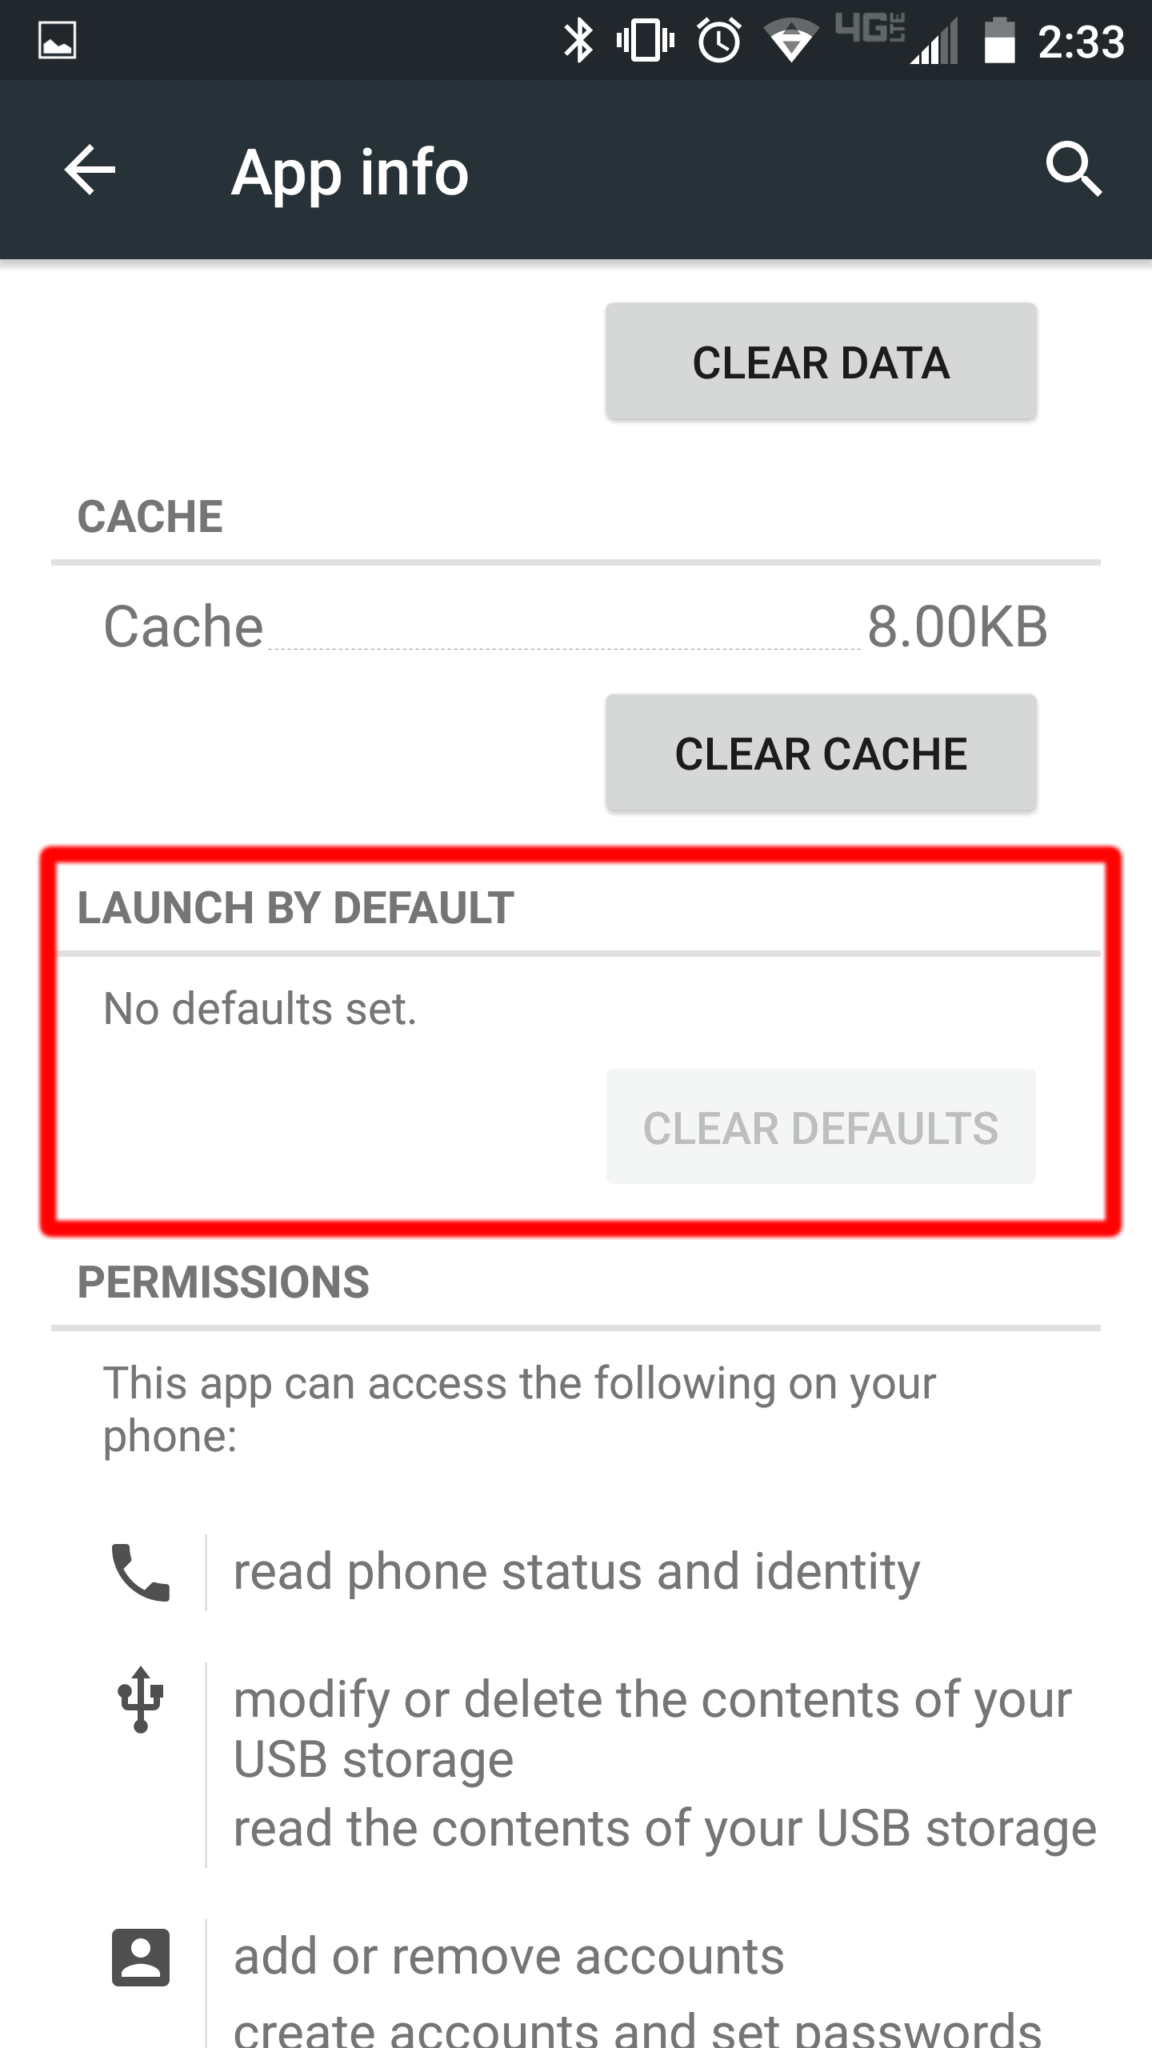
After clearing defaults the next time you launch the link/file type that apps was associated with, you will be prompted to choose a default app again.

Another Option to see and clear default apps on android is to use a third party tool.

How to see a list of current default apps

Android doesn’t provide a complete list of file and link types but a third-party app called Default App Manager provides a list of current defaults and helps you set defaults for many of the apps.

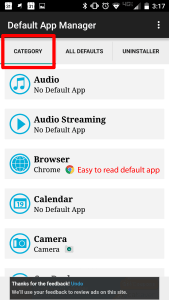
The app has two tabs: Category and All Defaults.

The Category Wise tab shows general categories such as Browser, Calendar, Camera and email along with the name of whatever app is currently set as default for them. If a file type has no associated app, Default App Manager will list it as having no default.


To set or change a default app in Default App Manager:

1. Tap a category (example: Email).

how to change Default android app

2. Tap Clear Default to remove the current app, if there is one. You will then be transported to Android’s built-in app menu, where you have to tap Clear Defaults for that app and then hit the back button to return to Default App Manager.

3. Tap Set Default. A dialog box will appear asking you to complete the action.

4. Select the app you want and tap Always.

The categories don’t include granular links such as URLs, which could potentially launch their own apps (ex: Amazon).

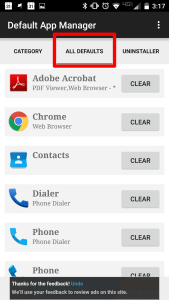
The All Defaults tab in Default App Manager shows all default apps, no matter which category the app is associated with giving you more granular control. You can use this option to change an app’s defaults by tapping the Clear button.  This will take you to that app’s info screen where you can hit the Clear Defaults button.

Default android app

www.TMDTechnology.com

10 Things to Consider Before Moving Your Office Network

Cloud_computing_tmdAn office move requires careful planning and forethought. The following considerations provide valuable guidance for moving your office technology.

  1. Think of the move as an opportunity to a better network | An office move can provide the perfect opportunity to re-evaluate your IT systems, introduce new technology and upgrade your equipment.Consider the future of your company and the flexibility your network will need as your company expands. Assess your needs and work out exactly what you will need to add to provide for your future growth.  You may even want to explore new cloud services ahead of your move to mitigate certain pain points.
  1. Hire a network professional to fine tune your information systems | Obtaining expert advice long before the move will help take the guesswork out of what equipment and Internet connectivity you’ll need. Let a professional design and manage the implementation of the network and absorb the difficulties associated with troubleshooting new setups.You also get an idea of what the costs will be, including the benefits of on-going maintenance and support. Planning the installation process with a professional takes the load off your shoulders and many unseen thorns out of your side.
  1. Save on downtime with proper planning | Install the new system over the weekend or during your downtime to minimize disruption to the business. If the installation will take longer, inform clients and users in advance so they know what to expect.  Often this will eliminate or at least lessen the many angry messages you will need to respond to once back online.One client reported, “Before we moved offices, we sent an email to all of our clients informing them about the move and provided all our clients with alternate contact details. We received valuable business related calls thanks to this pre-planning”
  1. Moving valuable, sensitive equipment requires care | Moving servers, computers and network equipment takes great care. These devices are often heat, moisture and shock sensitive.A moving truck is obviously an essential part of the office move, though extra care needs to be taken concerning packaging.
  1. Prepare for impact | Your delicate electronics need to travel comfortably between cushioned barriers, preventing devices from jarring together. Wrapping the equipment in anti-static bubble wrap helps shield the equipment preventing the loss of valuable data.Equipment should ideally be placed in crates. Each crate should be dedicated to one complete system that is labelled for easy identification.
  1. Consider added Insurance | When it involves your businesses crucial digital data, ensure you have a back-up plan in case something happens during the move. Most insurance companies offer various policies for insuring computers against theft and damage.
  1. Find out if your new building has the facilities for your network | Be sure to conduct a site survey and evaluate what your network needs are. This helps to curb overspending on equipment and identifies the best possible locations for installing access points. It also ensures that sufficient internet provider options are available in the new location. Internet can take 30-120 days to install depending on the technology.
  1. Things work better when cabling is installed before the move | Before the move goes ahead, the new network’s cabling and network infrastructure should be in place and ready for each labeled workstation crate to be placed next to the correct plugs, power leads and phone lines.
  1. Power On: Starting up the new network | Expect a few glitches; problems are inevitable with any office move or new network. Having a professional available onsite for the first day or two is an invaluable asset and well worth the investment.  Installation support ensures that the company can deal with any unforeseen problems during this initial start-up period.
  1. Lastly, don’t go at it alone | Many companies go down the DIY computer networking route before seeking advice from professionals. Having a professional on board before the move will not only save you time, but save you money.  Unless you have a qualified team, installing a network can turn ugly and extremely frustrating.

ContactTMDDon’t wait until it’s too late!  Call TMD Technology Services early so we can help plan your move and evaluate the options for your new location. (561) 404-9251.

  • Onsite Business Computer Support
  • Monthly Managed IT Services
  • Web Design and Internet Marketing
  • Computer Repairs and Upgrades

Our initial consultation is FREE.

TMDTechnology.com

How to set up email on an Android phone or tablet

PhoneDroidYou can connect to your Office 365 or other Exchange-based email on an Android phone or tablet. When you set up an Exchange account on your Android, you’ll be able to access and synchronize your email, calendar, and contacts. If you only want to use email, you can set up POP or IMAP email on an Android. If you have a different device, see Phone and tablet setup reference. If you’re having trouble connecting your device after following these steps, see What else to I need to know? at the end of this article.

NOTE If you have an Office 365 email account see Use Office 365 on your Android Phone for detailed information about how to use Office 365 on your phone or tablet.

Set up Microsoft Exchange email on an Android

  1. From the Applications menu, select Email. This application may be named Mail on some versions of Android.
  2. Type your full email address, for example tony@contoso.com, and your password, and then select Next.
  3. Select Exchange account. This option may be named Exchange ActiveSync on some versions of Android.
  4. Enter the following account information and select Next.
  • Domain\Username Type your full email address in this box. If Domain and Username are separate text boxes in your version of Android, leave the Domain box empty and type your full email address in the Username box.

NOTE On some versions of Android, you must use the domain\username format. For example, if your email address is tony@contoso.com, type contoso.com\tony@contoso.com. Your username is your full email address.

  • Password Use the password that you use to access your web Office 365 account.
  • Exchange Server Use the address of your Exchange server. If you’re connecting to your Office 365 email, use outlook.office365.com for your server name. If you are not using Office 365, see Find your ActiveSync server name later in this article.
  1. As soon as your phone verifies the server settings, the Account Options screen displays. The options available depend on the version of Android on your device. The options may include the following:
  • Email checking frequency The default value is Automatic (push). When you select this option, email messages will be sent to your phone as they arrive. We recommend only selecting this option if you have an unlimited data plan.
  • Amount to synchronize This is the amount of mail you want to keep on your mobile phone. You can choose from several length options, including One day, Three days, and One week.
  • Notify me when email arrives If you select this option, your mobile phone will notify you when you receive a new email message.
    Sync contacts from this account If you select this option, your contacts will be synchronized between your phone and your account.
  • Select Next and then type a name for this account and the name you want displayed when you send e-mail to others. Select Done to complete the email setup and start using your account.

NOTE You may need to wait ten-to-fifteen minutes after you set up your account before you can send or receive e-mail.

Find your Exchange ActiveSync server name

If your email program isn’t able to automatically find your Exchange ActiveSync server name, you may need to look it up.

If you’re connecting to your Office 365 email, use outlook.office365.com as your Exchange ActiveSync server name.

If you’re connecting to an Exchange mailbox, but aren’t using Office 365, or if you aren’t sure if you’re using Office 365, follow these steps to look up your Exchange ActiveSync server name.

  1. Sign in to your account using Outlook Web App.
  2. If you’re connecting to an Exchange mailbox, but aren’t using Office 365, your Exchange ActiveSync server name is contained in address bar in your browser when you are signed in to Outlook Web app – -but without the leading https:// and without the trailing /owa. For example, if the address you use to access Outlook Web App is https://mail.contoso.com/owa, your Exchange ActiveSync server name is mail.contoso.com.
  3. If you’re unable to connect to your mailbox using the information earlier in this section, you can try the server name value that displays in Outlook Web App options.
    In Outlook Web App, from the toolbar, click Settings Gear Icon > Options > Account > My account > Settings for POP and IMAP access.

NOTE Although you’re not setting up a POP3 or IMAP account, you’ll use the POP server name to determine your Exchange ActiveSync server name.

  1. Under POP setting, look at the value for Server name.
  • If the Server name value is outlook.office365.com, your account is an Office 365 account, and you can use outlook.office365.com as your Exchange ActiveSync server name.
  • If the Server name value is not outlook.office365.com, you can try using the server name listed on your options page. For example, if the server name is mail.contoso.com, try using mail.contoso.com as your Exchange server name.

That Should Do it!  Email should begin to flow.  You may be prompted to use a password on your phone if your administrator has put those policies in place.

Call TMD Technology Services for additional Computer and Phone Support.

Headquartered in Delray Beach, FL.

5 Ways To Extend The Battery Life of Your Mobile Devices

PhoneDroid1). Display brightness

The screens on mobile devices seem to be getting bigger and brighter every year. While these screens are easier on the eyes they are killing the batteries. Unfortunately battery technology hasn’t progressed as fast as other sectors of the mobile industry.

Reduce the brightness of your display will help to improve battery life and avoid using automatic brightness settings which actually drains your battery more rapidly than adjusting your brightness manually.

2). No cell coverage

Having poor or no service can be a real pain. You may have noticed that your battery drains quickly when you have an inconsistent signal. This happens because the device is continuously searching for a signal and attempting to communicate with a cell tower.

To conserve your battery, I recommend enabling Airplane mode or connecting to a Wi-Fi network (if available) if you will be in area with no service for an extended period of time.

3). Streaming video and playing games

As mentioned above, the display draws an incredibly large amount of power. Even more power is required when you are playing a game or streaming a movie. Streaming a netflix movie or playing a video game will kill your battery life by more than 50 percent.

If you will be away from your charger for a long time and don’t have a portable juice pack, understand that battling your friends in the latest game will see your battery life quickly reach zero.

4). GPS and location services

Have you noticed that your phone always seems to be on the verge of dying when you are using GPS?  Location services, which allow location-based apps and websites like Foursquare, Google Maps, and the camera to determine your location, can quickly drain your battery.

Using GPS and geotagging features, such as recording the location of your photos on facebook, will chew up additional battery. You can usually disable location features for select apps and services in the settings menu of your device.

5). Background data services

To ensure you never miss an email, headline, or an appointment, the apps on your mobile device are constantly pinging a server, satellite, or cell tower. This can sometimes lead to battery drain and even data overages. I recommend setting certain apps to only update and refresh over Wi-Fi, or not at all.