File and Folder Name Best Practices and File Name Limitations

Good file names are essential to accessibility. Many offices utilize a network server to store files so that they are accessible from multiple locations by various people. This requires that file names (as well as folder structures) make sense to more than just the creator. A file name should be clear to everyone in the department or agency in which the file was created. A record should be distinguishable from files with similar subjects as well as different versions of the same file. When other individuals access a record, they may be using different operating systems (Microsoft Windows, Mac OSX), different versions of the system (e.g. Windows Vista, Windows XP), or different software (e.g. Microsoft Word, OpenOffice.org Writer, Notepad); therefore, it is important to follow rules that will allow a file to be recognized in as many different environments as possible.

Rule #1: Avoid using special characters in a file name. \ / : * ? “ < > | [ ] & $ , . The characters listed above are frequently used for specific tasks in an electronic environment. For example, a forward slash is used to identify folder levels in Microsoft products, while Mac operating systems use the colon. Periods are used in front of file-name extensions to denote file formats such as .jpg and .doc; using them in a file name could result in lost files or errors.

Rule #2: Use underscores instead of periods or spaces. As mentioned above, periods already have a specific function in a file name, which is to tell the computer program where the file-name extension begins. Spaces are frequently translated in a Web environment to be read as “%20”. For example, TMD Technology.doc would appear as TMD%20Technology.doc if it were available online. This alteration can cause confusion in identifying the actual file name. Spaces in file names can also cause broken links, because word processing tools like Microsoft Word, and e-mail clients like Microsoft Outlook, recognize spaces as an opportunity to move to another line. Another difference that is found among operating systems and software is the acceptable length of file names. Some systems allow up to 256 characters, while others allow far fewer.

Rule #3: Generally about 20-25 characters is a sufficient length to capture enough descriptive information for naming a record.

Rule #4: Limit The number of sub folders you use in your tree structure.  Each folder and character adds to your file name limit.  Folder names should be descriptive but short.

TMDTechnology.com

Outlook 2013 | 2010 – Export Auto Fill / Auto Complete data

This document will assist with the locating and saving a AutoFill / AutoComplete file in Outlook 2013.

Note: This document will help you locate the auto complete Stream_Autocomplete file associate with your Outlook account, for outlook 2010 and Outlook 2013 using Windows 7 and 8/8.1. The path where the file is stored is C:\Users\*username*\AppData\Local\Microsoft\Outlook\RoamCache. Below are directions on how to find this file.

*Show Hidden Files and Folders*

How to locate and save the “Auto Complete file” in Outlook 2010/2013 for Windows 7/8.1.

    1. Open Start Menu.
      • Win 7: Select the Windows Start Button.
      • Win 8/8.1: Press the Start Button on your keyboard to launch the Windows 8 tile menu or hover your cursor toward the lower left corner of your window to make the Start Button appear.
Windows 7 Windows 8/8.1
Windows7Startbutton Windows 8 Start button
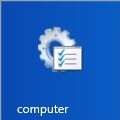
    1. Double-click on Computer if using Windows 7, for Windows 8/8.1 users type Computer and select the Computer tile
      • Windows 7

Windows 7 Computer folder

      • Windows 8/8.1

Computertile

    1. Double-click on Local disk C:

Windows 8 Local Disk C

  1. Double-click on Users folder.

Users folder

    1. Double-click on Username of the target user.

Users Profile

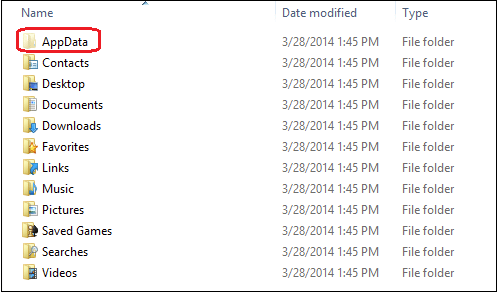
    1. Double-click on the AppData folder.
      • Must have administrative privileges

AppData folder

    1. Double-click on the Local folder.

Local folder

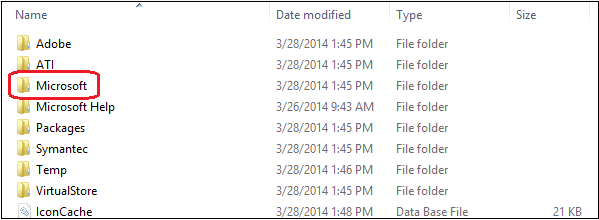
    1. Double-click on Microsoft folder.

Microsoft folder

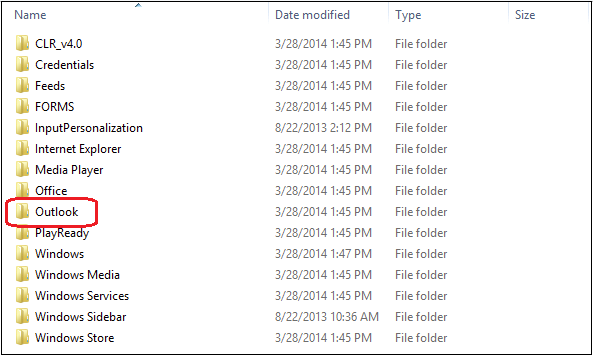
    1. Double-click on Outlook.

Outlook folder

    1. Double-click on RoamCache.

RoamingCache folder

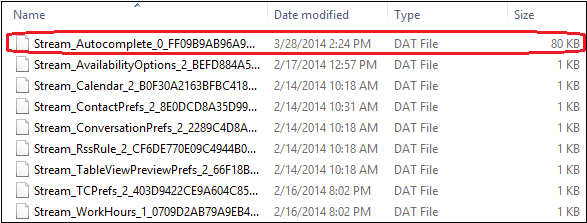
    1. The file that starts with Stream_Autocomplete_**** contains the Autocomplete file used in Office 2013.

Stream_AutoComplete File>

  1. Save this file to a flash drive or other media target and use it to import the Auto Complete names into another Outlook 2013 account.
  2. To import first rename any existing autocomplete file to autocompletexxx.old Then you must rename the newly imported file to match the existing file name in the target location.

Windows 7 & 8 – Show Hidden Files and Folders

This document will explain how to show hidden files and folders on your hard drive file system.


CAUTION: Windows stores many important settings in hidden files and folders. Do not modify or delete hidden files if you do not know precisely what will happen as a result. We assume no liability for data loss that occurs as a result of this procedure.


Procedure

  1. Access the Control Panel.
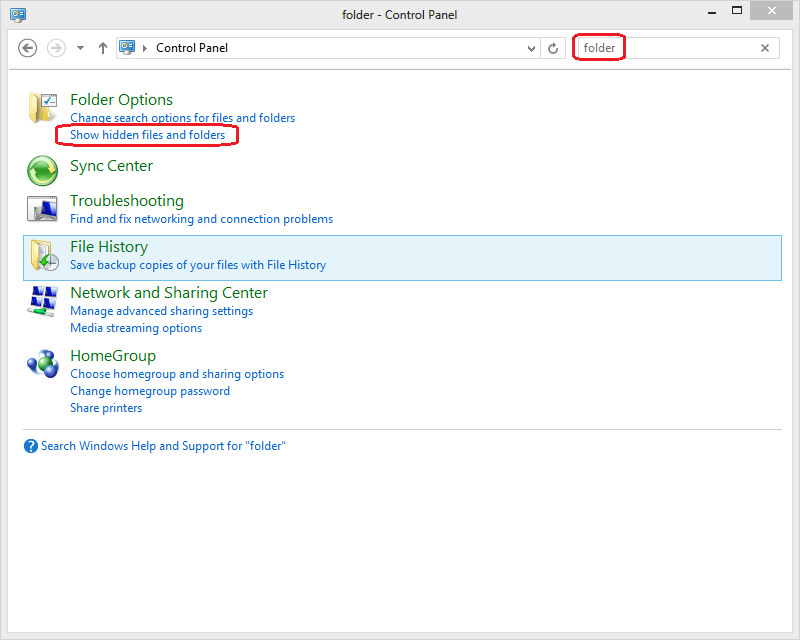
  2. Type “folder” into the search bar and select Show hidden files and folders.Win8 Folder
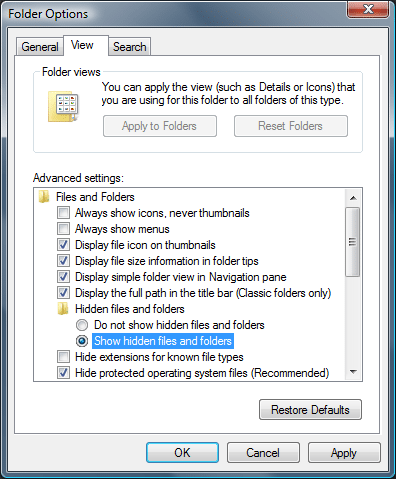
  3. Then, click on the View tab at the top of the window.
  4. Under Advanced Settings, locate “Hidden files and folders.” Select Show hidden files and folders just below that.folderOptions.png
  5. Click on OK.
  6. Hidden files will now be shown when performing searches in Windows Explorer.
    • Note: Hidden files will be greyed out. This is merely to indicate that they are a hidden file. You can still use them as though they were a normal file.

www.TMDTechnology.com

Create and add an email signature in Outlook Web App

Create a signature

  1. Sign in to Outlook Web App. For help, see Sign in to Outlook Web App.
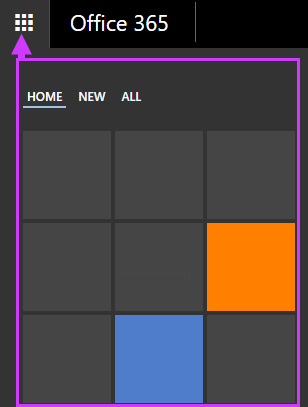
  2. On the nav bar, choose Outlook (or Mail).OrChoose App launcher Office 365 app launcher icon > Outlook.

    Office 365 navigation options

  3. On the nav bar, choose Settings Settings icon > Options.
  4. Under Options, choose Settings > Mail.OrUnder Options, choose MAIL > Layout > Email signature.
  5. Under Email signature, in the text box, type the signature you want to use. Use the formatting mini toolbar to change the appearance of the signature.
  6. If you want your signature to display at the bottom of all outgoing items, including replies and forwards, select Automatically include my signature on messages I send. If you don’t select this option, you manually can add your signature to any message.
  7. Choose Save.


Manually add your signature to a new message

If you’ve created a signature, but didn’t select the option to add your signature to all outgoing messages, you manually can add it to specific messages.

  1. Sign in to Outlook Web App.
  2. On the nav bar, choose Outlook (or Mail).OrChoose App launcher Office 365 app launcher icon > Outlook.

    Office 365 navigation options

  3. Choose New mail above the folder list. A new message form opens in the reading pane.
  4. At the top of the message, choose insert Insert > Signature (or Your signature).
  5. When your message is ready to go, choose send Send.

Automatically add your signature to every message you send

If you’ve created a signature, you can specify if the signature is added to all outgoing messages, including replies and forwards.

  1. Sign in to Outlook Web App.
  2. On the nav bar, choose Outlook (or Mail).OrChoose App launcher Office 365 app launcher icon > Outlook.

    Office 365 navigation options

  3. On the nav bar, choose Settings Settings icon > Options.
  4. Under Options, choose Settings > Mail.OrUnder Options, choose MAIL > Layout > Email signature.
  5. Under Email signature, do one of the following:
    • To include your signature at the bottom of all outgoing items, select the Automatically include my signature on messages I send check box.
    • To exclude your signature from showing at the bottom of all outgoing messages, clear theAutomatically include my signature on messages I send check box.